Cameras

When producing a media product it is very important to have a good quality and well functioning camera. For my media projects I will be using Canon DSLR cameras. It is important for me to thoroughly understand how to work these cameras so that my projects will be good quality and I can work efficiently.
DSLR Cameras
DSLR Cameras are very popular cameras that create great footage for a smaller price. They have a big sensor which is sensitive to light so they can shoot in low light situations while maintaining good quality. Theses are the camera I will be using throughout my course so it is important I become familiar with them.
Mode dial
Power Switch

Shutter button

Control Dial
Viewfinder
Lens
Display Screen
Main features of a DSLR Camera
White Balance and Colour Temperature

White balance and Colour temperature are both very important in taking good quality photos.
Colour temperature is the tone of colour that ranges from a cool blue tint to an warm orange tint. This can be measures using Kelvin (the unit of temperature) For example 10,000K is a clear blue sky whereas a candle flame which is a warm orange is 1,000K.
White balance is a feature that corrects the changes in colour under different light sources. When filming in different locations with different brightness levels it is important to change the white balance so that the colour in your shot is captured correctly in different types of light.


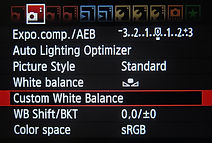
How to set White Balance
To customary set White Balance on a Canon DSLR camera take an image of something white or mid-grey where you will be shooting. Go onto menu and select the cameras custom white balance mode and set the image you have taken as the reference. This will set the White Balance.

Shutter
ISO
Shutter allows light to enter the frame for a set period. A slow shutter speed lets in more light it increases exposure and adds 'motion blur'. Motion blur is the visual streaking that happens as a result of movement. A fast shutter speed decreases 'motion blur' and lowers exposure.
In DSLR cameras shutter speed is measured in fractions of a seconds. Frame rate determines you shutter speed in order to get your shutter speed you double your frame rate. For example 50 frames per second would be a shutter speed of 1/100.

ISO is the International Organisation of Standardisation. This is the numerical scale that refers to the cameras sensitivity to light. It is used to make your shot lighter or darker.
A bigger ISO number means the more sensitive to light the camera will be but if the number is too high it can look very bad. The lower the ISO camera means the less sensitive the camera is to light.

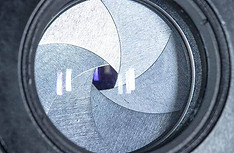
Aperture
The Iris inside the camera lens controls the amount of light that can enter the camera. The Iris, also known as the aperture, is the circular hole made by thin leaves of metal that closes to make a smaller hole called the f-stop. The larger the whole the more light is let in and the higher the f-stop number for example F2.8. The aperture open means more depth of field so a more blurred backround.

Camera Shots and movements
In order to produce good cinematography it is important to chose the right camera shots and movements to suit the scenes. You need to consider camera framing, shot size and movement all of these having a purpose in audience reaction and the overall look for your project. Having a variety of Camera Shots and Movements makes films more visually interesting so they can be important.
Framing
Framing is the placement or position of the subject you are filming in your shot. Depending on how you frame your shot can signify the importance of the subject and also reveal the physical relationships between subjects and the camera.
Single Shot
A shot with one subject.
Two Shot
Three Shot
A shot with two subjects.
A shot with three subjects

Over the shoulder
Shows the subject from behind the shoulder of another character.

POV Shot
Shows the view from the characters perspective.

Shot size
Shot sizes is how big or small the frame is in relation to the subject. Different shot sizes can have different impacts and can change the way the audience feels about the subject. Shot sizes can also show the surroundings of the character so the audience get a better feel of where the character is.
Close up and Extreme Close up
Long shot
Shows only facial features of character expression.
Captures the subject with wide view of the surroundings.


Medium shot
Aerial shot
Shows half of the subject and shows their body language.

A shot positioned above a subject high in the air.

Camera Movement
The way the camera shifts and moves to shape the audiences perspective of the scene. Camera Movement can also emphasise the importance of a specific moment in the scene and
help direct the audiences eyes.
Zoom
When the length of the camera lens is adjusted to give the effect of moving closer to the subject.

Pan and tilt
Pan left
Panning is the left to right camera movement and tilt is up and down both camera movements make the audience feel like moving spectators.
Tilt up


5 Shot Sequence
A five shot sequence is a technique that uses 5 different shots to show an activity. Five shot sequences creatively show an activity and there is potential to create more complex sequences.

5) Unusual/Low Angle
Reveals more to the viewer. Shows more about what is in the foreground/background.
In summary the 5 shot sequence was reasonably straight forward to shoot and I can see how it can be used for a variety of different tasks and activities. I think it is a good way to introduce a specific character and what they are doing. In the future I could use this technique but add more complex shots to make it more interesting.
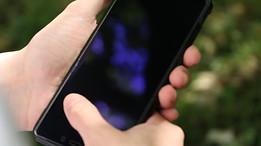
1) Close up of hands
What is being done? This shot engages the viewer as it only subtly reveals what action is being performed. Gives a sense of mystery. My image shows a close up of his hands holding his phone.

2) Close up of the face
Shows who is doing the action. Ensure to frame it well and cut off top of head but no chin. Give 'talk space' in front of eyes and nose and make sure to show both eyes. My image shows his face staring down at his phone.
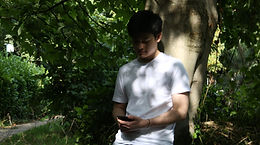
3) Wide shot
Shows environment and where the action is being done. Gives sense of location, mood and surroundings.

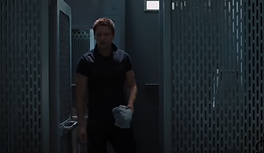
4) Over the shoulder
How is the action being done? Combines close ups and wide shots to reveal more about the action.
Exposure Triangle
The Exposure Triangle combines the three elements that make up exposure. These elements are ISO, Shutter speed and Aperture.

ISO-International Organisation for Standardization
ISO is the numerical figure that refers to the cameras sensitivity to light. The figure could be 200, 400, 600 etc. A high ISO is used in darker environments and will make your shot more grainy whereas a lower ISO is used for lighter environments. ISO should be the last thing you adjust when setting up exposure.
Shutter Speed
Shutter Speed is the length of time that the cameras shutter is open for. Shutter Speed is a fractional value for example 1/250 or 1/50 etc. A fast shutter speed is good for bright light and filming something fast whereas a slow shutter speed is better for low light and filming something with slower movement.

Aperture is the size of the hole that lets light into the cameras sensor. An example of an aperture measurement is f/2.8 or f/8 etc. A small aperture is good for bright environments as it lets less light in whereas a large aperture lets more light in so it better for darker environments. The BIGGER the number the SMALLER the aperture.


Using the Exposure Triangle
We used Canon DSLR Cameras to practise the Exposure triangle. First we took 3 photos of the same object and changes the exposure. First taking an under exposed photo, then perfectly exposed then over exposed.
Under Exposed
ISO-100
Shutter-50
Aperture-7.1

Perfectly Exposed
ISO-125
Shutter-50
Aperture- f/4.0
Over Exposed
ISO-200
Shutter-59
Aperture- f/2.8
These images were taken inside. This means that we had to adjust the camera settings including white balance and the exposure triangle. Inside photos don't have the natural light that outdoor ones do so it was important to get the camera setting right to avoid the images being over exposed.


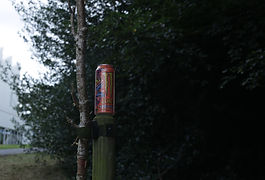
These two images were shot outside in the sunlight and are overexposed. To improve the images we would have to adjust the exposure triangle such as the ISO so that there is less exposure and the images would have a more natural and less glaring look.


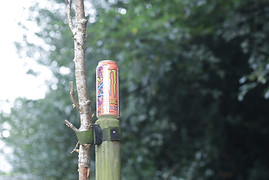
These two images were taken outside but we took more time adjusting the camera setting so that they where not over exposed. We also shot these photos in the shade under the tree because partially cloudy day meant that the sun was consistently changing so it was easier to shoot consistently in the shade.
Overall I found using the exposure triangle a little challenging at first as there was a lot of new setting to learn on the cameras. But with a bit of practise I became more familiar and confident and took some better images. In the future I could hire out a camera and practise these settings in different locations.


180-degree rule
The 180 degree rule is when two characters in a scene should maintain the same left/right relationship to each other. This technique helps the audience keep track of where the characters are in a scene.
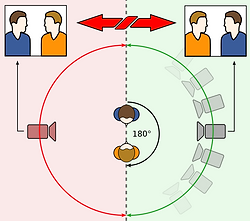
How the 180-degree rule works
When filming imagine that there is an imaginary line between two characters eye line. The camera should stay on one side of this imaginary line. When following this rule the characters will appear continuously on the left or right depending on which side the camera is on.


Breaking the 180-degree rule
Crossing the line is when the camera passes over the imaginary line. This becomes what is called a reverse angle. A reverse angle makes the two characters positions switch from either left or right to the opposite.
In order for the rule to not be broken the characters stay on either the right or left of the frame through the entire scene. Some filmmakers choose to break this rule as a sign that something has gone wrong for the characters.
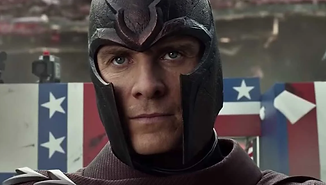
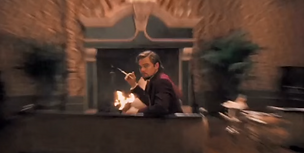
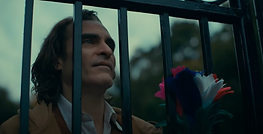
Breaking the 180-degree rule can effect the audience and make them feel disconnected and confused. It can also be disorientating and can distract the audience from the intent of the scene. In this scene from 'The Shining' Jack Nicholson's character is loosing his mind and by breaking the rule the audience feel uneasy and unsettled to what will happen.


180- degree rule
Breaking the 180-degree rule
Practising the 180-degree rule
For this task we used a Canon DSLR 6D camera and filmed Asa from two shot angles following the 180 degree rule. We made sure that Asa's eyeline met on both of the shots.

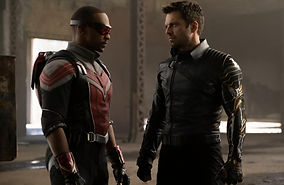
This is our example of following the 180 degree rule. The two characters featured are Barry (with stereo) and Larry (without stereo). By following the 180 degree rule Barry is continuously on the right and Larry will stay on the left no matter where the camera is positioned on the line.

This is an example of breaking the 180 degree rule. When breaking the rule Larry is now positioned on the right side of the imaginary line. Breaking the 180 degree rule shows gradual change in the scene.
Overall this task was a little bit challenging as it took us a while to understand the rule. Our first attempt wasn't great but after a little bit of feedback we understood what to do better. On our second attempt at filming we improved and were more successful. From doing this task I now understand how this rule works and can now identify when it is used in film. I will be applying this rule to my future projects as I think it is effective and shows a characters conversation very well.
Lighting
Lighting is very important in video and can be the difference between a professional looking video and a poor quality production. Lighting also allows attention of focus on specific parts of characters which gives more of an effect.

3 Point Lighting

Three Point Lighting is a traditional lighting method that uses three light sources surrounding the subject in different positions. This Lighting method creates a three dimensional effect of the subject. The brightness level and colour of the lights can change the mood of the camera shot and make different effects.
The three lights included in this technique are the Key Light, Fill Light and Back Light. The position of these lights gives the subject the best visibility on camera.
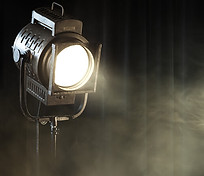
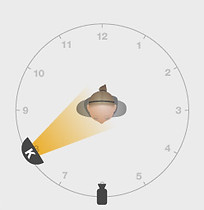
Key Light
Back Light
Fill Light
The Key Light is the main light source. It shines directly onto the subject from the front, right or front left. It establishes look and feel of the shot.
The Fill Light provides balance to the Key Light and 'fills in' the rest of the subjects face. Should be positioned to the side that is opposite the Key Light.
The Back Light creates a good looking rim of light around the subject, separating them from the background. Creates silhouette effect.


Intensity
It is important in Three Point Lighting to get the Light Intensity correct so your end product is good quality. Lighting intensity is controlled by dimmers which are knobs that can brighten or lower the light.

Barn Doors
Barn Doors are flaps that can be placed in front of the light to direct the rays. Closing the barn doors around the light creates a more concentrated light stream onto the subject. Whereas a more open barn door means that more light can fill the subject.
3 Point Lighting Task
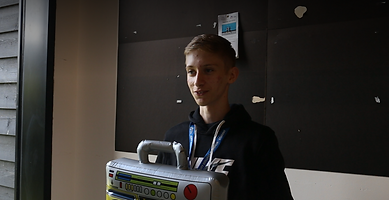
The task for 3 Point Lighting included filling in a worksheet identifying what type of lighting is being used and what effect this has. Then Ellie demonstrated how the 3 Point Lighting task worked and we played around with intensity and colour. It was very interesting and we got informed about important health and safety tips such as using heat protective gloves as the lights can get very hot.


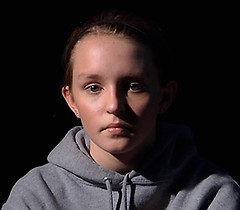
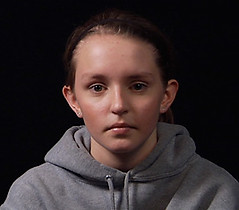
This photo shows the Key Light which is positioned to the left of Josh. It establishes the left side of his face but leaves the right side more in the shadows.
Then we introduced the Fill Light on the right side of Josh. This light filled in the rest of Josh's face with a soft light.
Finally we turned on the Back Light which created a rim around Josh's head. We also used the Rule Of Three and positioned Josh to the right of the frame.
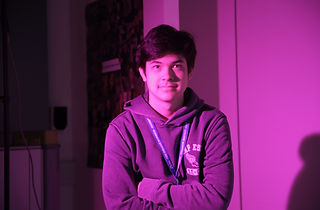

Finally we used colour gels and clipped then onto the barn doors with bulldog clips. Using the gels made the lighting cool colours such as purple and greens which has a really cool effect. You can also combine it by putting different colours on different light so you have cool effects.
Overall I enjoyed exploring 3 point lighting and can see how it effects shots and hows good they look. In the future I would like to use the colour gels to make my footage more unique and have a better aesthetic. I also think it makes footage more professional so will have to rent out some lights to make the lighting in my footage look great.